Recovering From a Failed Database Migration in Production
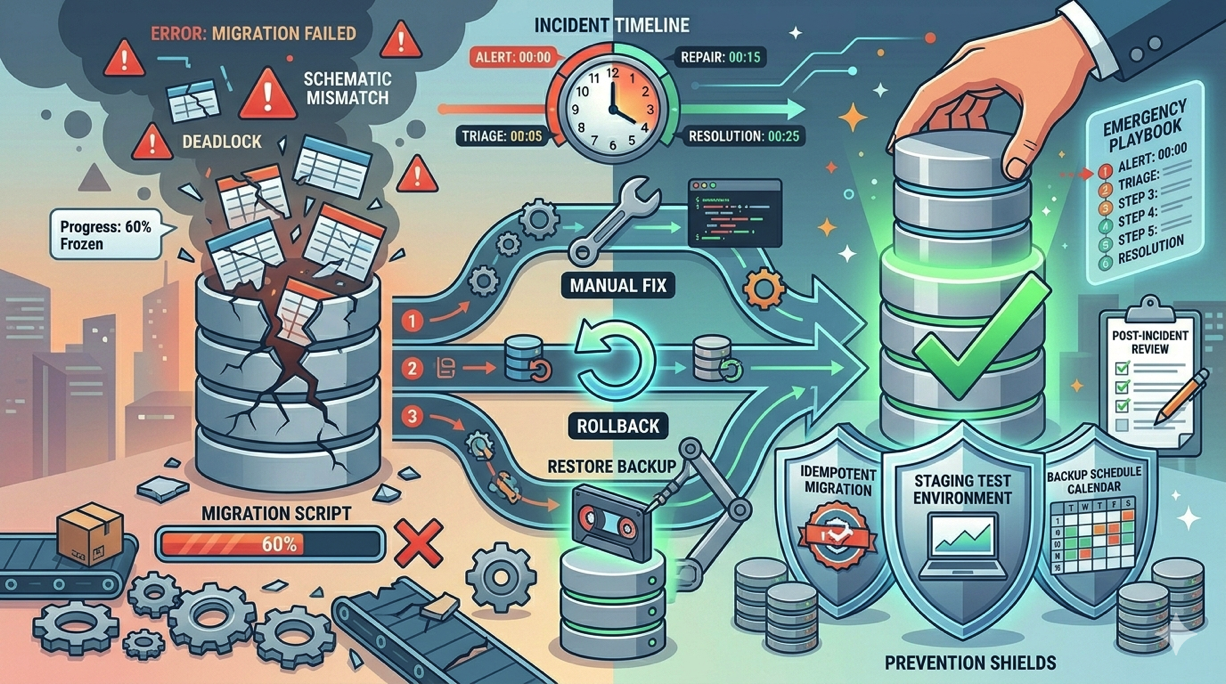
You deploy your latest release. The deployment log is scrolling through your hooks, and then you see it: SQLSTATE[42S21]: Column already exists or worse, the migration runs halfway through and the process times out. Your database is now in a partially migrated state. Your application is throwing 500 errors. Users are affected.
Failed database migrations in production are among the most stressful incidents a developer can face. Unlike a bad code deploy where you can simply roll back to the previous release, a migration that has partially altered your database schema leaves you in a state that neither the old code nor the new code can work with.
This guide covers how to recover from failed migrations, how to restore from backups when manual recovery is not possible, and most importantly, how to prevent migration failures from ever reaching production.
Understanding Why Migrations Fail in Production
Before diving into recovery, it helps to understand why migrations fail in the first place. The most common causes are:
Schema conflicts. The migration assumes a column or table does not exist, but it does. This happens when someone made a manual schema change or when migrations were run out of order.
Data-dependent failures. The migration tries to add a NOT NULL column without a default value to a table that already has rows. Or it tries to create a unique index on a column that has duplicate values.
Timeouts. Large tables with millions of rows take a long time to alter. Adding an index or modifying a column on a table with 50 million rows can take hours, and the migration may time out.
Lock contention. ALTER TABLE statements on MySQL and MariaDB acquire table-level locks. If your application is still serving traffic and writing to the table, the migration can deadlock or take exponentially longer.
Memory exhaustion. Some migrations load data into memory for transformation. On a server with limited RAM, this can cause the PHP process or the database itself to be killed by the OOM killer.
Step 1: Assess the Damage
The moment you realize a migration has failed, your first job is to understand exactly what state your database is in. Do not run more migrations. Do not attempt to re-run the failed migration. First, assess.
Connect to your server using the Deploynix web terminal and check the migration status:
php artisan migrate:statusThis shows you which migrations have run and which have not. If the failed migration appears as "Ran," it means Laravel recorded it in the migrations table even though it may have only partially completed. If it does not appear, Laravel never recorded it, but the schema changes it made before failing may still be in place.
Next, examine the actual database schema to understand what changes were applied:
# For MySQL/MariaDB
mysql -u deploynix -p your_database -e "DESCRIBE your_table;"

# For PostgreSQL
psql -U deploynix -d your_database -c "\d your_table"
Compare the current schema against what the migration was trying to achieve. Identify which statements in the migration executed successfully and which did not.
Step 2: Decide Your Recovery Path
You have three options, and the right one depends on the severity of the situation.
Option A: Manual Fix and Continue
If the migration partially completed and you can identify exactly which statements ran, you can manually apply the remaining changes and then mark the migration as complete.
For example, if your migration was adding three columns and only two were added before it failed:
# Manually add the missing column
mysql -u deploynix -p your_database -e "ALTER TABLE orders ADD COLUMN shipping_method VARCHAR(255) DEFAULT 'standard';"

# Mark the migration as run without re-executing it
php artisan migrate --pretend  # verify what would run
If the migration file is the only pending migration, you can insert the record into the migrations table manually:
INSERT INTO migrations (migration, batch)
VALUES ('2024_06_15_120000_add_shipping_columns_to_orders', 5);
This approach works well when the failure was simple and you can clearly see what remains to be done.
Option B: Roll Back and Fix
If the migration has a proper down() method and was recorded as run, you can roll it back:
php artisan migrate:rollback --step=1This reverses the last batch of migrations. After rolling back, fix the migration file, commit the fix, and redeploy.
However, be cautious. If the migration's up() method only partially completed, the down() method may fail too because it tries to reverse changes that were never made. Always review the down() method before running rollback in this scenario.
Option C: Restore From Backup
When the migration has left your database in a truly mangled state, or when you have lost data due to a destructive migration like dropping a column or table, restoring from a backup is your safest option.
This is where your Deploynix backup configuration becomes critical. If you have been running scheduled database backups to AWS S3, DigitalOcean Spaces, Wasabi, or any custom S3-compatible storage, you can restore your database to the exact state it was in before the failed deployment.
Step 3: Restoring From a Deploynix Backup
If you have decided that a backup restore is necessary, here is the process.
First, download your most recent backup. In the Deploynix dashboard, navigate to your server, then to the backup section. Find the most recent backup that was taken before the failed deployment.
Once you have the backup file on your server, restore it:
# For MySQL/MariaDB
mysql -u deploynix -p your_database < backup_file.sql

# For PostgreSQL
pg_restore -U deploynix -d your_database backup_file.dump
After restoring, verify the schema and data:
php artisan migrate:status
# All migrations up to the last successful deploy should show as "Ran"
Now roll back your application code to the previous release using Deploynix's rollback feature. This ensures that your code and database schema are in sync.
Step 4: Get Your Application Back Online
With the database in a known good state and the application code rolled back to the matching release, verify that everything is working:
# Clear all caches
php artisan cache:clear
php artisan config:clear
php artisan route:clear
php artisan view:clear

# Test a basic database query
php artisan tinker --execute="DB::select('SELECT 1');"
Check your application in a browser or with curl. Monitor the logs for any errors:
tail -f /home/deploynix/your-site/current/storage/logs/laravel.logPreventing Migration Failures: A Pre-Deploy Checklist
The best way to handle a failed migration in production is to never have one. Here are the practices that dramatically reduce the risk.
Test Migrations Against a Production-Like Database
Your local SQLite database or a fresh MySQL instance with no data will not catch the same problems as a production database with millions of rows and real data patterns. Before deploying, test your migration against a copy of production data.
You can use Deploynix's backup feature to create a snapshot of your production database, restore it to a staging server, and run your migrations there first. Deploynix makes it straightforward to provision a separate database server for staging and testing purposes.
Use Your Deploy Script for Pre-Migration Checks
Add a sanity check to your Deploynix deploy script before migrations execute:
# Check what migrations would run before executing them
php artisan migrate --pretend
The --pretend flag shows you exactly what SQL statements the migration would execute without actually running them. You can add this before php artisan migrate --force in your deploy script to log the planned changes. If you want to halt the deployment on unexpected migrations, add a conditional check that fails the script.
Make Migrations Idempotent
Write your migrations so they can safely be run multiple times. Use checks before making schema changes:
public function up(): void
{
    if (! Schema::hasColumn('orders', 'shipping_method')) {
        Schema::table('orders', function (Blueprint $table) {
            $table->string('shipping_method')->default('standard');
        });
    }
}
This way, if a migration partially fails and you need to re-run it, the statements that already succeeded will be safely skipped.
Never Drop Columns in the Same Release That Stops Using Them
This is a classic mistake. You remove a column reference from your code and drop the column in a migration, all in the same release. If you need to roll back the code, the old code expects the column to exist but it has been dropped.
Instead, use a two-phase approach:
Release 1: Deploy code that stops reading from or writing to the column. The column still exists in the database.
Release 2: Deploy the migration that drops the column, once you are confident Release 1 is stable and will not need to be rolled back.
Add Timeouts to Long-Running Migrations
For migrations that alter large tables, set an explicit timeout:
public function up(): void
{
    DB::statement('SET SESSION wait_timeout = 3600');

    Schema::table('large_table', function (Blueprint $table) {
        $table->index('frequently_queried_column');
    });
}
Better yet, for very large tables, consider using online schema migration tools or running the ALTER during a maintenance window when traffic is minimal.
Always Write Down Methods
Every migration should have a functional down() method that properly reverses the up() method. This is your safety net for rollbacks. Verify that the down method works by running migrate and migrate:rollback locally before committing.
Schedule Backups Before Every Deploy
Configure your Deploynix backup schedule to run immediately before your typical deployment window. If you deploy daily at 2 PM, schedule a backup at 1:45 PM. This ensures you always have a fresh backup to restore if a migration goes wrong.
Deploynix supports multiple backup storage providers including AWS S3, DigitalOcean Spaces, and Wasabi. Use at least one remote backup destination so your backups survive even if the server itself has problems.
Use a Staging Environment
Deploynix lets you provision multiple servers. Set up a dedicated staging server that mirrors your production configuration. Deploy to staging first, run your migrations there, and verify everything works before deploying to production. This is the single most effective way to catch migration problems before they affect real users.
Use the same database engine in staging as you do in production. If production uses MySQL 8, do not test migrations against MariaDB or SQLite. Schema behavior differs between database engines in subtle ways that can cause migrations to pass in one and fail in another.
Building a Migration Safety Culture
Beyond technical safeguards, build a team culture around migration safety:
Code review every migration. Migrations deserve the same scrutiny as application code. Review them for potential data loss, lock contention, and performance impact on large tables.
Communicate before deploying migrations. If a migration modifies a heavily-used table, let the team know. Consider deploying during low-traffic periods.
Document destructive changes. If a migration drops data, document why and confirm that the data is no longer needed or has been archived.
Practice restores regularly. Do not wait for an emergency to find out your backup restore process does not work. Schedule quarterly restore drills.
Conclusion
A failed database migration in production is a high-pressure situation, but with the right preparation and tools, it is entirely recoverable. Deploynix gives you the infrastructure to handle these incidents effectively: automated backups to multiple storage providers, instant deployment rollbacks, web terminal access for diagnosis, and the ability to quickly provision staging environments for pre-deploy testing.