WebSockets 101 for Laravel Developers: From Concept to Production on Deploynix
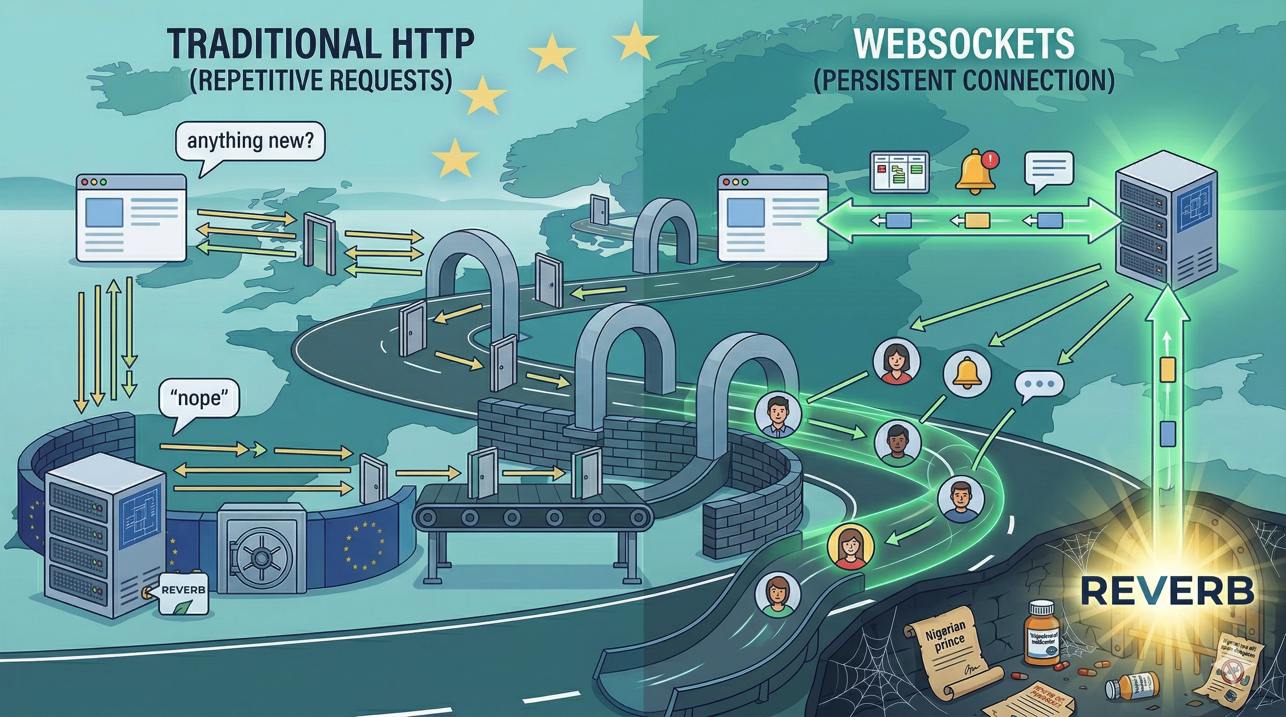
Most web applications are built on a simple model: the browser sends a request, the server processes it, the server sends a response, and the connection closes. This request-response cycle has powered the web for decades, and it works perfectly for the vast majority of interactions. But there are moments when it falls short.
Imagine a project management app where multiple team members are viewing the same task board. Alice moves a task from "In Progress" to "Done." Bob, who is looking at the same board, does not see the change until he refreshes the page. In a traditional HTTP application, Bob's browser has no way to know that something changed on the server. It would have to poll repeatedly, asking the server "did anything change?" every few seconds, which is wasteful and introduces latency.
WebSockets solve this problem elegantly. Instead of closing the connection after each request-response cycle, a WebSocket connection stays open. The server can push data to the browser the instant something happens, without the browser asking. Alice moves the task, the server broadcasts the change, and Bob's browser updates in real time.
This guide takes you from zero WebSocket knowledge to a working real-time feature in your Laravel application, deployed and running on Deploynix.
How WebSockets Work
A WebSocket connection starts as a regular HTTP request. The browser sends an HTTP request with a special Upgrade header that says "I would like to switch to the WebSocket protocol." If the server supports WebSockets, it responds with a 101 status code (Switching Protocols), and the connection transitions from HTTP to WebSocket.
Once the connection is upgraded, it becomes a full-duplex communication channel. Both the browser and the server can send messages at any time, independently of each other. The connection remains open until either side explicitly closes it, or a network interruption occurs.
The key differences from regular HTTP:
Persistent: The connection stays open for the duration of the session. No repeated handshakes, no connection overhead for each message.
Bidirectional: The server can push data to the client without the client requesting it. The client can also send data to the server at any time.
Low latency: Messages are delivered in milliseconds because there is no connection setup for each message.
Low overhead: WebSocket frames have minimal headers compared to HTTP requests, so the per-message overhead is tiny.
WebSockets are ideal for features like live notifications, real-time dashboards, chat applications, collaborative editing, live activity feeds, and any situation where users need to see changes as they happen.
Laravel Broadcasting: The Framework Layer
Laravel does not ask you to work with raw WebSocket connections. Instead, it provides a Broadcasting system that abstracts the complexity into a clean, event-driven API. You define events in PHP, broadcast them, and listen for them in JavaScript. Laravel handles the plumbing.
The broadcasting system has three components:
Events: Standard Laravel events that implement the ShouldBroadcast or ShouldBroadcastNow interface. When these events are dispatched, Laravel serializes their public properties and sends them to the broadcasting driver.
Channels: Named channels that organize broadcasts. Laravel supports three types:
Public channels that anyone can listen to.
Private channels that require authentication. The server verifies that the user is authorized to listen on the channel before allowing the connection.
Presence channels that are private channels with the additional ability to see who else is listening. These are perfect for showing "who's online" indicators.
Laravel Echo: A JavaScript library that connects to the WebSocket server and provides a clean API for subscribing to channels and listening for events.
Reverb vs. Third-Party Services
Before Reverb, Laravel developers had two main options for WebSocket infrastructure: Pusher (a paid, hosted service) and laravel-websockets (a community package that ran a WebSocket server alongside your Laravel app). Each had trade-offs.
Pusher is easy to set up but introduces a third-party dependency, ongoing costs, and the latency of routing messages through an external service. The laravel-websockets package kept everything in-house but was a community project with varying maintenance and could be tricky to run reliably in production.
Laravel Reverb changed the equation. Reverb is a first-party Laravel package, maintained by the Laravel team, that provides a high-performance WebSocket server designed specifically for Laravel Broadcasting. It runs on your own servers, so there is no third-party dependency, no per-message pricing, and no added latency from routing through an external service.
Reverb is built on ReactPHP and handles thousands of concurrent connections efficiently. It integrates seamlessly with Laravel's authentication system for private and presence channels, and it works out of the box with Laravel Echo.
For most Laravel applications deploying on Deploynix, Reverb is the clear choice. You get full control over your WebSocket infrastructure, zero external dependencies, and first-party support from the Laravel team.
Setting Up Reverb in Your Laravel Application
Let's walk through adding Reverb to an existing Laravel application.
Step 1: Install Reverb
Install Reverb using the Artisan installer:
php artisan install:broadcastingThis command installs the Reverb package, publishes the configuration file, adds the necessary environment variables to your .env file, and installs the JavaScript dependencies (Laravel Echo and the Pusher JS client, which Echo uses as its WebSocket client library).
Step 2: Configure Environment Variables
After installation, your .env file will have new Reverb-related variables:
BROADCAST_CONNECTION=reverb

REVERB_APP_ID=your-app-id
REVERB_APP_KEY=your-app-key
REVERB_APP_SECRET=your-app-secret
REVERB_HOST="localhost"
REVERB_PORT=8080
REVERB_SCHEME=https
In development, localhost is fine. For production on Deploynix, you will configure these differently (we will cover that in the deployment section).
Step 3: Create a Broadcastable Event
Create an event that implements ShouldBroadcastNow:
<?php

namespace App\Events;

use App\Models\Task;
use Illuminate\Broadcasting\Channel;
use Illuminate\Broadcasting\InteractsWithSockets;
use Illuminate\Broadcasting\PrivateChannel;
use Illuminate\Contracts\Broadcasting\ShouldBroadcastNow;
use Illuminate\Foundation\Events\Dispatchable;
use Illuminate\Queue\SerializesModels;

class TaskStatusUpdated implements ShouldBroadcastNow
{
    use Dispatchable, InteractsWithSockets, SerializesModels;

    public function __construct(
        public Task $task
    ) {}

    public function broadcastOn(): array
    {
        return [
            new PrivateChannel('project.'.$this->task->project_id),
        ];
    }

    public function broadcastWith(): array
    {
        return [
            'task_id' => $this->task->id,
            'title' => $this->task->title,
            'status' => $this->task->status,
            'updated_by' => $this->task->updatedBy->name,
        ];
    }
}
There are two key choices here. First, ShouldBroadcastNow sends the broadcast immediately rather than queuing it. For time-sensitive real-time features, this avoids queue latency. Use ShouldBroadcast if the slight delay of queue processing is acceptable and you want to reduce the load on your web process.
Second, broadcastWith() controls exactly what data is sent to the client. Without this method, all public properties are serialized, which might include data you do not want to expose to the frontend. Always define broadcastWith() to be explicit about your payload.
Step 4: Define Channel Authorization
For private channels, define the authorization logic in routes/channels.php:
use App\Models\Project;

Broadcast::channel('project.{projectId}', function ($user, $projectId) {
    $project = Project::find($projectId);

    return $project && $project->team->users->contains($user);
});
This callback receives the authenticated user and the channel parameters. It should return true if the user is authorized to listen on the channel, or false to deny access.
Step 5: Listen on the Frontend
On the JavaScript side, Laravel Echo makes subscribing to channels and listening for events straightforward:
Echo.private(`project.${projectId}`)
    .listen('TaskStatusUpdated', (event) => {
        console.log('Task updated:', event.task_id, event.status);
        // Update your UI here
        updateTaskStatus(event.task_id, event.status);
    });
If you are using Alpine.js (which pairs well with Laravel Blade applications), you can integrate Echo directly into your Alpine components:
<div x-data="taskBoard()" x-init="listenForUpdates()">
    <!-- Your task board markup -->
</div>

<script>
function taskBoard() {
    return {
        tasks: @json($tasks),
        listenForUpdates() {
            Echo.private(`project.{{ $project->id }}`)
                .listen('TaskStatusUpdated', (event) => {
                    const task = this.tasks.find(t => t.id === event.task_id);
                    if (task) {
                        task.status = event.status;
                    }
                });
        }
    };
}
</script>
Step 6: Dispatch the Event
When a task status changes in your application, dispatch the event:
public function updateStatus(Request $request, Task $task): RedirectResponse
{
    $task->update(['status' => $request->status]);

    event(new TaskStatusUpdated($task));

    return redirect()->back();
}
That is the complete flow. The user updates a task, the server dispatches the event, Reverb broadcasts it to all connected clients on the project's private channel, and every team member viewing the project sees the update instantly.
Deploying Reverb on Deploynix
Running Reverb in production requires a process that stays alive continuously to handle WebSocket connections. On Deploynix, you manage this using daemons.
Step 1: Configure Production Environment Variables
On your Deploynix server, set the Reverb environment variables through the environment management section of the dashboard:
REVERB_HOST="0.0.0.0"
REVERB_PORT=8080
REVERB_SCHEME=https
Setting the host to 0.0.0.0 allows Reverb to accept connections on all network interfaces.
Step 2: Set Up the Reverb Daemon
In your Deploynix dashboard, create a new daemon for the Reverb server:
Command:
php artisan reverb:startDirectory:
/home/deploynix/your-site.com/currentUser:
deploynix
Deploynix uses Supervisor to manage daemons, which means your Reverb process will automatically restart if it crashes and start on server boot.
Step 3: Configure Nginx for WebSocket Proxying
Your Deploynix-managed Nginx configuration needs to proxy WebSocket connections to the Reverb server. Deploynix handles Nginx configuration for your sites, and you can add custom Nginx directives to support WebSocket proxying.
The Nginx configuration needs to proxy requests on your WebSocket path to the Reverb port, including the Upgrade and Connection headers that enable the HTTP-to-WebSocket upgrade:
location /app {
    proxy_pass http://127.0.0.1:8080;
    proxy_http_version 1.1;
    proxy_set_header Upgrade $http_upgrade;
    proxy_set_header Connection "upgrade";
    proxy_set_header Host $host;
    proxy_set_header X-Real-IP $remote_addr;
    proxy_set_header X-Forwarded-For $proxy_add_x_forwarded_for;
    proxy_set_header X-Forwarded-Proto $scheme;
    proxy_read_timeout 60s;
    proxy_send_timeout 60s;
}
Step 4: SSL Termination
WebSocket connections in production should use the wss:// protocol (WebSocket Secure), which is WebSocket over TLS. Deploynix automatically provisions SSL certificates for your sites, and Nginx handles SSL termination. The connection between the client and Nginx is encrypted (wss://), and Nginx proxies to Reverb over unencrypted WebSocket (ws://) on localhost. This is secure because the localhost connection never leaves the server.
Step 5: Configure Echo for Production
Update your frontend Echo configuration to point to your production WebSocket endpoint:
window.Echo = new Echo({
    broadcaster: 'reverb',
    key: import.meta.env.VITE_REVERB_APP_KEY,
    wsHost: import.meta.env.VITE_REVERB_HOST,
    wsPort: import.meta.env.VITE_REVERB_PORT ?? 443,
    wssPort: import.meta.env.VITE_REVERB_PORT ?? 443,
    forceTLS: true,
    enabledTransports: ['ws', 'wss'],
});
Set the corresponding Vite environment variables in your .env:
VITE_REVERB_APP_KEY="${REVERB_APP_KEY}"
VITE_REVERB_HOST="yourapp.com"
VITE_REVERB_PORT=443
VITE_REVERB_SCHEME=https
Handling Reconnections and Edge Cases
In production, WebSocket connections will drop. Users switch networks, laptops go to sleep, and occasionally the server restarts during a deployment. Your frontend code needs to handle reconnections gracefully.
Laravel Echo automatically attempts to reconnect when a connection drops. However, during the disconnection period, the client misses any broadcasts. For critical features, implement a "catch-up" mechanism: when the connection re-establishes, fetch the latest state from the server via a regular API call to ensure the client is in sync.
Echo.connector.pusher.connection.bind('connected', () => {
    // Re-fetch current state after reconnection
    fetchLatestTasks();
});
For deployments on Deploynix, the zero-downtime deployment process means your application code updates without dropping WebSocket connections. However, if you need to restart the Reverb daemon (for example, after a configuration change), existing connections will drop. Configure your deploy script to restart the Reverb daemon gracefully, giving connected clients time to reconnect.
When to Use WebSockets (and When Not To)
WebSockets add complexity to your infrastructure and application code. They are the right choice when:
Users need to see changes from other users in real time (collaborative features, live dashboards).
You need server-initiated communication (notifications, alerts, live progress indicators).
The data changes frequently and polling would be wasteful.
They are not the right choice when:
The data changes infrequently. If your data updates once an hour, polling every 60 seconds is simpler and perfectly adequate.
The data is only relevant to the user who triggered the action. A form submission that redirects to a success page does not need WebSockets.
You have very few concurrent users. The overhead of maintaining a WebSocket server for 10 users is hard to justify.
For many Laravel applications, the sweet spot is using WebSockets selectively for features that genuinely benefit from real-time updates, while keeping the rest of the application on traditional HTTP.
What You Have Now
If you have followed this guide, you have a working real-time feature in your Laravel application: events fire on the server, Reverb broadcasts them, and Echo picks them up on the frontend. Your Deploynix-managed server runs Reverb as a daemon with automatic process management, Nginx proxies WebSocket connections with proper SSL, and your application handles reconnections gracefully.
This foundation supports everything from simple notification toasts to complex collaborative features. Start with something small, like showing a "New comment" badge when someone comments on a post. Once you see how the pieces fit together, you will find opportunities to add real-time features throughout your application. The infrastructure is ready. The framework makes it straightforward. Now build something your users will love.